How to Roll Roti Properly Using Chakla and Belan
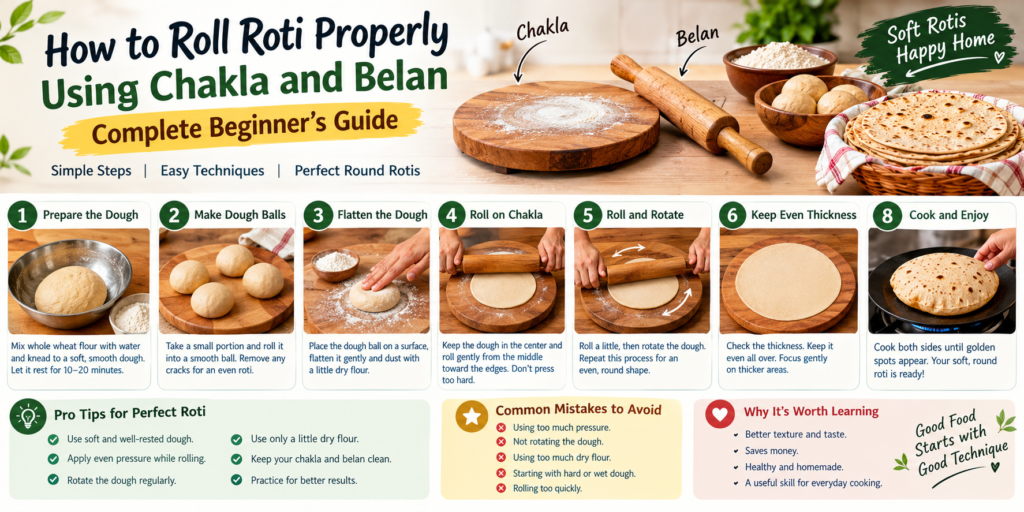
Making a soft and perfectly round roti is a useful kitchen skill, but getting the rolling technique right can take some practice. The chakla and belan make the process much easier when you know how to use them correctly.
If your roti becomes too thick, too thin, uneven, sticky, or oddly shaped, the problem may not be your dough alone. Your rolling technique, pressure, dry flour, and even the position of the dough can affect the final result.
In this beginner-friendly guide, you will learn how to roll roti properly using chakla and belan, from preparing the dough to creating an evenly shaped roti ready for the tawa.
What Are Chakla and Belan?
A chakla is a flat board used as a rolling surface, while a belan is the traditional rolling pin used to flatten and shape roti dough.
The chakla provides a stable surface, while the belan helps spread the dough evenly. Together, they are among the most commonly used tools for preparing Indian rotis.
For comfortable rolling, choose a chakla that does not move easily and a belan that feels balanced in your hands.
Step 1: Prepare Soft and Smooth Dough
Before learning how to roll roti, start with properly prepared dough.
Add whole wheat flour to a mixing bowl and gradually add water while mixing. Knead the dough until it becomes soft and smooth. Avoid making the dough extremely hard or excessively wet.
A good dough should feel soft and flexible without sticking heavily to your hands.
After kneading, let the dough rest for around 10–20 minutes. Resting can make the dough easier to roll and handle.
Step 2: Make an Even Dough Ball
Take a small portion of dough and roll it between your palms to create a smooth ball.
Try to remove major cracks from the surface. A smooth dough ball makes it easier to create an evenly shaped roti.
The size of the dough ball depends on how large you want your roti to be. For beginners, starting with a medium-sized ball can make rolling easier.
Step 3: Flatten the Dough
Place the dough ball on a clean surface and gently flatten it with your fingers.
Lightly coat it with dry wheat flour. Turn it over and apply a small amount of flour to the other side if necessary.
Do not use excessive dry flour. Too much flour can make the rolling process messy and may affect the texture of the cooked roti.
Step 4: Place the Dough on the Chakla
Put the flattened dough in the center of your chakla.
Hold the belan comfortably with both hands. Start rolling gently from the center toward the outer edge.
The most important rule for beginners is simple: do not press too hard.
Use steady, moderate pressure and let the belan move smoothly across the dough.
Step 5: Roll and Rotate
This is one of the most important techniques for making a round roti.
Roll the dough a little, then rotate it slightly with your fingers. Continue rolling and rotating instead of repeatedly rolling in only one direction.
For example:
Roll → Rotate → Roll → Rotate → Check the shape
This helps distribute pressure around the dough and encourages it to become circular.
If one side becomes thicker, gently focus your rolling on that area rather than pressing the entire roti harder.
Step 6: Keep the Thickness Even
A good roti should have a reasonably even thickness across its surface.
If the center is thick while the edges are extremely thin, reduce the pressure near the edges. If one section is thicker, use gentle strokes in that area.
Do not rush. Fast rolling does not necessarily produce a better roti.
Consistency is more important than speed.
Step 7: Prevent the Roti From Sticking
If the dough sticks to the chakla or belan, lightly dust it with dry flour.
However, avoid adding large amounts of flour every few seconds. Excess flour can make the surface dusty and may burn on the tawa.
Another useful tip is to keep the chakla and belan clean and dry before starting.
Step 8: Aim for a Round Shape
Do not worry if your first roti is not perfectly round. Shape improves with practice.
To make a more circular roti:
- Start with a smooth dough ball.
- Apply even pressure.
- Rotate the dough regularly.
- Avoid pressing one side repeatedly.
- Correct uneven areas with gentle rolling.
- Stop once the desired size and thickness are reached.
Remember that a homemade roti does not need to look perfectly symmetrical to taste delicious.
Step 9: Transfer the Roti to the Tawa
Once the roti is rolled, gently lift it and place it on a properly heated tawa.
Avoid stretching the dough while transferring it. A stretched roti can become uneven.
Cook according to your preferred method, turning it at the appropriate stage. With practice, you will learn how your particular tawa and stove respond to different heat levels.
Common Mistakes When Rolling Roti
Beginners often make a few predictable mistakes.
Using Too Much Pressure
Heavy pressure can make the roti uneven or excessively thin around the edges.
Not Rotating the Dough
Rolling continuously in one direction can produce an oval or irregular shape.
Using Too Much Dry Flour
Excess flour can make the workspace messy and may burn during cooking.
Starting With Poorly Prepared Dough
Very hard, very wet, or insufficiently rested dough can make rolling difficult.
Rolling Too Quickly
Speed should come after control. First learn to apply consistent pressure and rotate the dough correctly.
How Can I Make Round Rotis Every Time?
The easiest approach is to focus on even dough, even pressure, and regular rotation.
Do not try to force the dough into a perfect circle immediately. Start by creating a reasonably round dough ball, then allow the rolling motion to gradually expand it.
With regular practice, your hand movements will become more natural and your rotis will become more consistent.
Frequently Asked Questions
Which is better for rolling roti: chakla and belan or a flat countertop?
A chakla and belan provide a dedicated rolling surface and traditional rolling tool. They can be especially convenient for beginners because the chakla gives you a defined working area.
Why does my roti become oval instead of round?
This usually happens when pressure is uneven or the dough is not rotated regularly. Try using gentler pressure and rotating the dough after every few rolling strokes.
Why does my roti stick to the chakla?
The dough may be too moist, or you may need a small amount of dry flour. Lightly dust the dough and chakla rather than adding excessive flour.
How much dry flour should I use?
Use only enough to prevent sticking. The exact amount depends on the moisture of your dough and the surface of your chakla.
How long does it take to learn to roll round roti?
There is no fixed timeframe. Some beginners become comfortable quickly, while others need more practice. Regular repetition is the best way to improve control and consistency.
Final Tips for Perfect Roti Rolling
Learning how to roll roti properly using chakla and belan is mainly about technique and practice. Start with soft, well-rested dough, use a stable chakla, hold the belan comfortably, apply moderate pressure, and rotate the dough regularly.
Most importantly, do not judge your progress by whether every roti is perfectly round. Focus first on even thickness and good texture. Once your rolling motion becomes consistent, creating round rotis will become much easier.
With a little patience and regular practice, the chakla and belan can become simple and effective tools for making delicious homemade rotis every day.